Want to add a hidden zipper pocket to the lining of a bag? Here's how!
1. Cut two rectangles of fabric to just larger than the size of your finished zipper pocket.
2. Draw a 1/2 inch thick rectangle on wrong side of one of your rectangles, at least 3/4 inches from the top and sides. (this rectangle will be the opening for your zipper)
3. Place the marked rectangle on your bag lining where desired, with right sides facing, and pin in place all around the drawn rectangle.
4. Stitch around the drawn rectangle with a short stitch length.
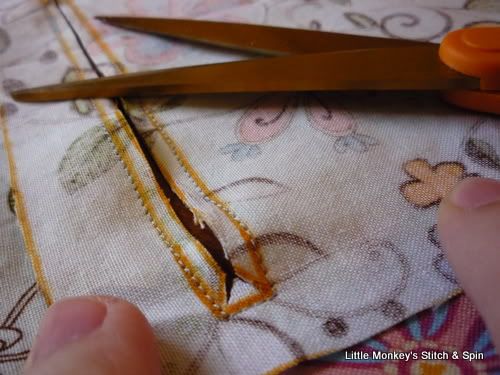
5. Carefully cut a slit in the rectangle, ending with a "Y" shape cut on either side. The ends of the "Y" should be cut as close as possible to the corners of the stitching, without cutting through tha actual stitches themselves.
6. Pull the pocket lining through the slit, and press.
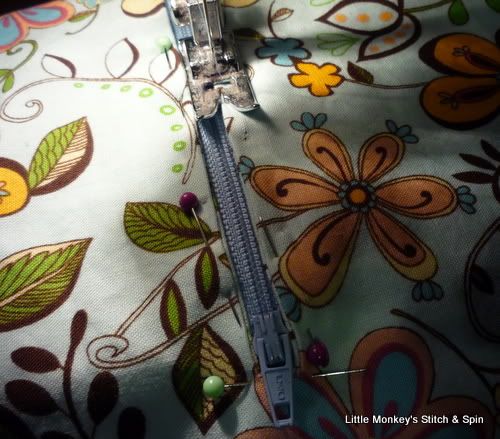
7. Pin the zipper in place behind the lining, making sure that the zipper pull is showing through the slit, Do not worry if the zipper is longer than the opening, you can cut the excess off later. Stitch carefully around the zipper. When you get to the zipper pull, stop stitching with the needle in the down position into the fabric, and lift the zipper foot. Pull the zipper to the back side of the sewing machine foot (this is a bit tricky, but it is easier to stitch the rest of the zipper on evenly if you move the zipper pull first), put the sewing foot back down, and finish stitching on the zipper.
8. Put the second pocket lining piece on the first, with right sides facing, and pin
ONLY the two pocket lining pieces together.
9. Carefully stitch around the pocket lining pieces, moving the bag lining layer out of the way as you go. Cut off any excess zipper length at this time.
10. Finish sewing your bag as desired.
Enjoy!


No comments:
Post a Comment